\MRCOOL 24K Mini-Split Install + Drywall Repair — West San Jose
Looking for an experienced, licensed and insured HVAC contractor to complete a **MRCOOL 24K mini-split installation in West San Jose this weekend, November 7–8.**
The supplied installation manual covers the **MRCOOL DIY single-zone system with Quick Connect refrigerant lines and R-454B refrigerant**. Please verify the exact indoor and outdoor model numbers against the equipment and manual before beginning.
**The job includes the complete installation, all connections, startup, testing, drywall repair, and cleanup. The system must be fully connected and operational when finished.** Please be able to perform or coordinate all parts of the work.
**Layout and concealed line routing**
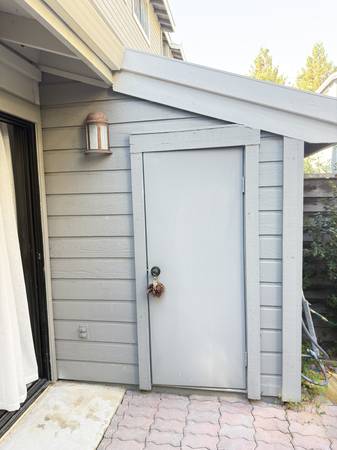
The indoor air handler will be mounted on the **blue interior wall shown in the photos**. The two insulated copper refrigerant lines, condensate drain, and electrical/control cable need to run **inside the wall cavity, through the wooden studs where structurally permitted, through the closet and attached storage shed, and outside to the condenser location**. An electrical disconnect is already installed on the exterior wall.
Drywall will need to be opened for access and replaced afterward. The installer must assess the framing, determine appropriate hole sizes and locations, and confirm that the route, drainage, and Quick Connect fitting locations comply with MRCOOL’s requirements. Discuss any necessary route changes before work begins.
**Required scope of work**
**1. Site assessment and preparation**
- Confirm matching equipment, inspect supplied components, and measure the required refrigerant-line, drain, and cable lengths.
- Identify any additional materials, approved extensions, mounting equipment, or access panels needed.
- Verify indoor mounting height, clearances, room-size requirements, and service access.
- Check outdoor clearances around the wall, fence, overhead structure, and vegetation.
- Identify any required permits or inspections and explain their costs and scheduling implications upfront.
- Protect floors, furnishings, and surrounding finishes.
**2. Indoor mounting and wall access**
- Securely install and level the mounting plate, then mount the indoor unit.
- Make the necessary drywall openings and framing penetrations while preserving structural integrity and avoiding existing wiring and plumbing.
- Install appropriate protective sleeves and protection for lines and cables at penetrations.
**3. Refrigerant lines and connections**
- Route, support, and insulate both copper refrigerant lines without kinking, crushing, or stressing the tubing or fittings.
- Follow MRCOOL’s Quick Connect connection and tightening procedures, including its restrictions on disconnecting and reconnecting fittings.
- Position the Quick Connect fittings according to the manufacturer’s requirements.
- Keep connections exposed for required inspections and leak testing before completing insulation and closing walls.
- Install the specified connector insulation and sound-absorbing materials, and protect exposed exterior lines.
**4. Condensate drainage**
- Install and connect the drain with proper slope and an appropriate discharge location.
- Insulate indoor drain sections to prevent condensation; avoid kinks, uphill sections, and water traps.
- Seal the unused indoor drain outlet.
- Water-test the drain pan and line to confirm free drainage without leaks.
- If gravity drainage will not work along the proposed route, identify and quote an approved solution before proceeding.
**5. Outdoor unit and electrical connections**
- Install and securely anchor the condenser on a suitable level pad, base, or approved support.
- Provide appropriate vibration control and outdoor condensate/defrost drainage.
- Have electrical work performed by a licensed electrician as specified in the manual.
- Verify the existing supply, dedicated circuit, breaker, wire sizing, disconnect, grounding, and required surge protection against the equipment nameplate and manual.
- Complete the electrical connection from the disconnect to the condenser and all power/control connections between units, using appropriate conduit, fittings, and cable protection.
**6. Startup and testing**
- Complete the manufacturer’s electrical safety checks and refrigerant leak checks.
- Confirm refrigerant valves are correctly opened and caps and covers are secured.
- Perform the manual’s **minimum 30-minute test run, including cooling and heating**, and recheck connections for leaks during operation.
- Verify drainage, insulation, secure mounting, louvers, and remote-control operation.
- Resolve installation-related faults, demonstrate the working system, and provide the completed startup checklist.
**7. Required drywall repair and cleanup**
- Complete testing and any required inspections before closing the walls.
- **Replace and patch all drywall opened or damaged during installation; tape, mud, sand, and match the surrounding texture, leaving surfaces ready for paint.**
- Install any required access panels and reinstall shelving or trim removed for access.
- Seal interior penetrations and weatherproof exterior openings.
- **Remove all packaging, construction debris, and installation waste, and thoroughly clean every affected work area.**
**Please reply with:**
- Your experience installing MRCOOL DIY Quick Connect systems, including R-454B models.
- License and insurance information.
- Availability this weekend and estimated completion time.
- A written quote covering labor, additional materials, electrical work, mounting support, drywall repair, and cleanup.
- Any exclusions or conditions that could affect the price or completion date.
Photos and the installation manual are available. A site visit can be arranged for a firm quote.